- Add images | Ctrl-A
Compose the list of images to be processed (all from the same subfolder!)
- Clear list | Ctrl-C
Clears the list, does not delete images
- Stack images in subfolders
Allows to stack images in several selected subfolders in one batch.
- Save result as
Saves the result image (in the right window) with new name
- Print result window
Sends the result image (in the right window) to the printer
- Show parameters/batch file
Shows a text file with all Parameters, allows for batch routines with varied parameters
- Exit PICOLAY | Ctrl-Q
Before quitting you will be asked whether any py-files generated by PICOLAY should be kept on disk or deleted
Menue items: Image list

- Reverse order of images | Ctrl-O
PICOLAY expects images taken from top to bottom. Here you can reverse the stack if you did it the other way around.
- Mark all | Ctrl-M
Only marked images will be processed by following routines.
- Toggle marks | Ctrl-T
- Rename marked files | Ctrl-N
For example, one could change 'py' in the names to prevent automatic overwriting or erasion of files.
- Remove marked files from list | Ctrl-R
Images will not be erased from disk.
- Delete marked py files = Markierte (von PICOLAY erzeugte) py-Dateien löschen
This will delete MARKED py-files generated by PICOLAY.
- Delete all py files | Ctrl-X
This will delete ALL py-files generated by PICOLAY.
- Delete all marked files (Caution!)
CAUTION, here you can erase orignal images - after confirmation.
- Add images | Ctrl-A
... from the same subfolder.
- Clear list | Ctrl-C
... does not delete images.
- Generate MPO file
The first two marked JPG-images in the list will be combined to a Multi-Picture-Object. This is a 3D format, e.g. for displaying steroscopic images on a 3D TV. Prior to do this you'll have to generate the two images with suited viewing angles using the 3D-routines of PICOLAY.
- Generate animated GIF image | Ctrl-G
Generates an gif animation from all marked images of your list. Check the animation before using the slide show function, and set display intervals and how to go on at the end of the list under [Options | Slide show features]. gif animations can be displayed by internet browsers, however, the file size will increase significantly with the number and dimensions of images.
- Start slide show | F12
Shows marked images as slide show. Use Use [Options | Slide show features] to set the display time, and whether to go backwards or start again at the 1st image, when the end of the list is reached.
Menue items: Stack operations

- Stack with current parameters | Ctrl-F1
Starts the stacking routine using the current parameters. If 'Test 4 param. sets' is checked four different sets will be tested. The routine generates unmarked images in the list. Their namen begin with 'pysharp' and furthermore describe the parameters used.
- Set stacking paramaters | F2
Opens the panel for setting the stacking parameters
- Colour-based stacking | F3
Instead of seeking for sharp structures, this routine extracts from an images stack pixels with a selected colour, e.g. of a dye or specific fluorescence. It generates unmarked images, whose names begin with 'pycolour' and describe the RGB values used as well.
- Average marked images | F4
Generates an image composed of the averaged RGB values in the stack, named 'pymean.jpg' (or 'pymean.bmp' etc.).
- Insert intermediate images | F5
This routine adds new images to your stack by combining the layers above and below and adding some sharpness and contrast to the average of these. Its helpful for 3D purposes if you don't have enough images to represent all layers of your object.
- Auto-align images & resize | F6
Ccorrects displacements and changes in size of your objects (keeping the original image dimensions). Additionally, you can correct rotations if you enable this unter 'Options'. This routine requires time, might cause artefacts in some cases. It should be applied only when necessary, i.e. for macro-images, images taken through binocular loupes, or in case of other displacements.
- Auto-adjust brightness | F7
This routine corrects flickering illumination in your stack.
- Set white blance | F8
This routine performs a white balance corrections in all marked images. It suggests the mean colour to be corrected. However, you can define (by a click with the RIGHT mouse button into an original image) the colour to be used as white or grey target.
- Add or subtract 1st image | F9
The first marked image in your list will be added (positive value) or subtracted (negative value) form the other marked images in the list. Absolute values below 1 cause partial addition or subtraction.
- Set background/flat-field | F10
The background correction not only subtracts the first marked image from the stack, but at the same time adds RGB values requinred to reach the target background colour. By this technique one can compensate uneven illumination, hot pixel and artifacts like dust, that causes visible flaws, and will generate a wonderful flat field.
- Divide by 1st image | F11
Hereby, the RGB values of the stack images (beginning with the 2nd one) will be divided by those of the 1st marked image in the list.
- Info: Depth maps and 3D views
Depth map and 3D-images can be generated only after you have stacked the images (or if you copied suited images as sharp result and depth map, see below).
- Info: Change image parameters
Image parameters as contrast, sharpness etc. are changed using the Enhance function present in the (left) image window.
Menue items: Options
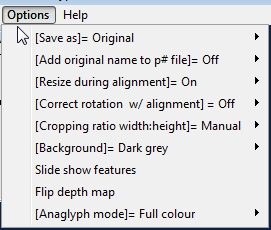
- [Save as] = File format of saved images
Pre-adjusted is 'Original', i.e. same as format of your originals. Alternatively, one can set the following formats: bmp, jpg, gif oder png.
- [Auto-save maps]
Here one can select whether any depth maps generated by the stacking procedure will be saved automatically. A depth map and the correponding stacked image can be used to generate many different types of 3D visualisations (without stacking the original images again).
- [Add original name to py file]
By this function one can add the original file names to those generated by PICOLAY, and not all files generated by PICOLAY with the same parameters will have the same names.
- [Resize during alignment]
Defines whether during the automatic position alignment objects may be resized as well. This function is preset to on, but should be switched off, if there are only position corrections to be done (for example at high magnification).
- [Correct rotation w/ alignment]
Additionally one can correct for rotation in the stack. The parameter is preset to off, and should be used only when necessary.
- [Cropping ratio width:height]
Defines whether and which fixed ratio width:height should cropped areas have. Preset is 'manual', i.e. no fixed ratio. Other options are: 1:1, 3:2, 4:3 und 16:9. Hereby one can get crops fitting to various screen formats like Full-HD etc.
- [Main window background]
The background of the main windows is preset to an unobtrusive blue, which can be switched to grey by this option.
- Slide show features
Here one can set two parameters: 1. For which interval (in milliseconds) should your images be displayed. 2. After reaching the end of the list, should the show run backwards or jump to the first image again?
Menue items: Help

- Freeware without any warranty
This is a free test version. Please process copies of your orignal images only in order to avoid any possble loss
- Short reference (HTML) | F1
Open this file with your internet browser by pressing the F1-key at any time. The help files should be stored in folder 'picolay_helpfiles', which should be a subfolder of the folder from where PICOLAY was started. If not found, PICOLAY will try to open them in the Internet.
- Manual (Text only)
Helpfile with clickable chapters in English and German.
- Open PICOLAY Homepage
There is more help, examples, tutorials and the newest PICOLAY version ready for download.
|